
No feeling beats testing your last function and all tests coming up green. I did a quick PR and sat back to sip my coffee while I waited for my PM’s approval message.
But when I did hear the message chime, I saw this:
`
…What?
Unfortunately, writing tests and getting the coveted green check is not an indication that the task is complete. Imagine that the test you’ve written only covers 50 percent of your code. Would a successful test result give you a satisfactory perspective of your codebase? Of course not. And that’s why you need code coverage.
What Is Code Coverage and Why Is It Important for Java Developers?
Code coverage is the measure of how much code is executed during testing. Simply put, it’s the percentage of code covered by tests. A program with high code coverage has been thoroughly tested and has a lower chance of containing software bugs.
Creating tests that cover the most important scenarios, paths, and edge cases give developers better insight into what parts of the codebase have been tested. This information comes in handy particularly when debugging. Obviously, increased test quality means increased product quality in the long run.
In this article, we’ll talk about Codecov, a code coverage tool available for GitHub, GitLab, and Bitbucket.
Setting Up JaCoCo with Jenkins and Codecov
In this tutorial, you’ll learn how to set up JaCoCo, a free code coverage library written in Java, in a Java application. You’ll use Jenkins, a continuous integration (CI) tool that allows continuous development, testing, and deployment of your software projects, and Codecov to analyze code coverage reports every time changes are pushed.
Running Tests and Coverage Locally
To run tests and coverage locally, you’ll need to use a few tools. Start by creating a simple Java application in IntelliJ IDEA or your favorite Java IDE.
public class AddSomeNumbers {
    public int addTwoNumbers(int num1, int num2){
        return num1 + num2;
    }
    public static void main(String[] args) {
        AddSomeNumbers addSomeNumbers = new AddSomeNumbers();
        int sum = addSomeNumbers.addTwoNumbers(404,204);
        System.out.println(sum);
    }
}
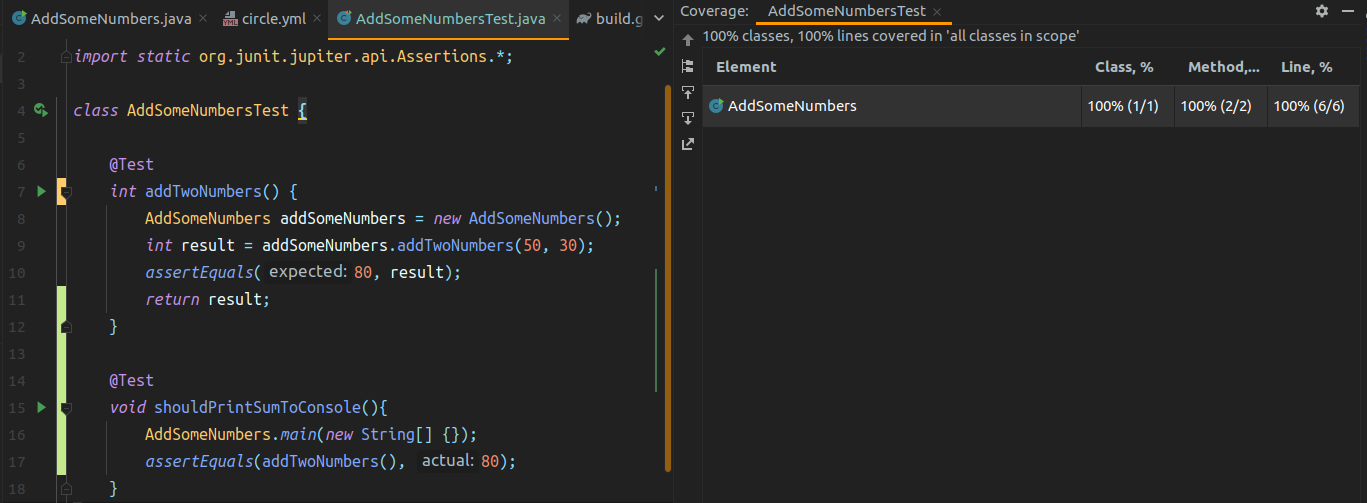
This is a simple class that houses a function that takes two integer numbers as input and returns their sum. Very simple and straightforward.
Next, write a test case for this class.
class AddSomeNumbersTest {

    @Test
    int addTwoNumbers() {
        AddSomeNumbers addSomeNumbers = new AddSomeNumbers();
        int result = addSomeNumbers.addTwoNumbers(50, 30);
        assertEquals(80, result);
        return result;
    }

    @Test
    void shouldPrintSumToConsole(){
        AddSomeNumbers.main(new String[] {});
        assertEquals(addTwoNumbers(), 80);
    }
}
This is a simple unit test to test your AddSomeNumbers.java class as a component. To run your test, right-click on the green button next to your test class and click Run.
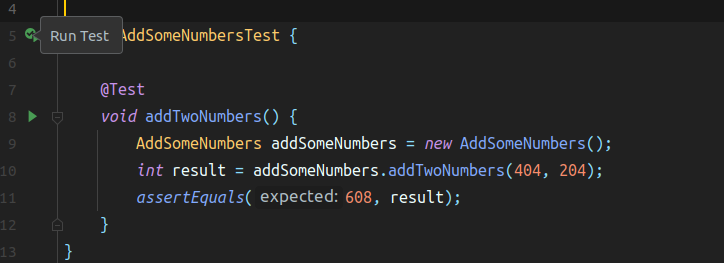
Make sure your test is passing before moving on to including coverage.

Congratulations on writing your tests and getting the coveted green checks! Now you can proceed to configure Jenkins and JaCoCo for code coverage.
Configuring Jenkins
Before moving forward, first, make sure your Jenkins installation is available on the internet. You can test locally by typing localhost:8080, which is the default local IP address for Jenkins, into your browser. For installation details, refer to the “Installing Jenkins” documentation.
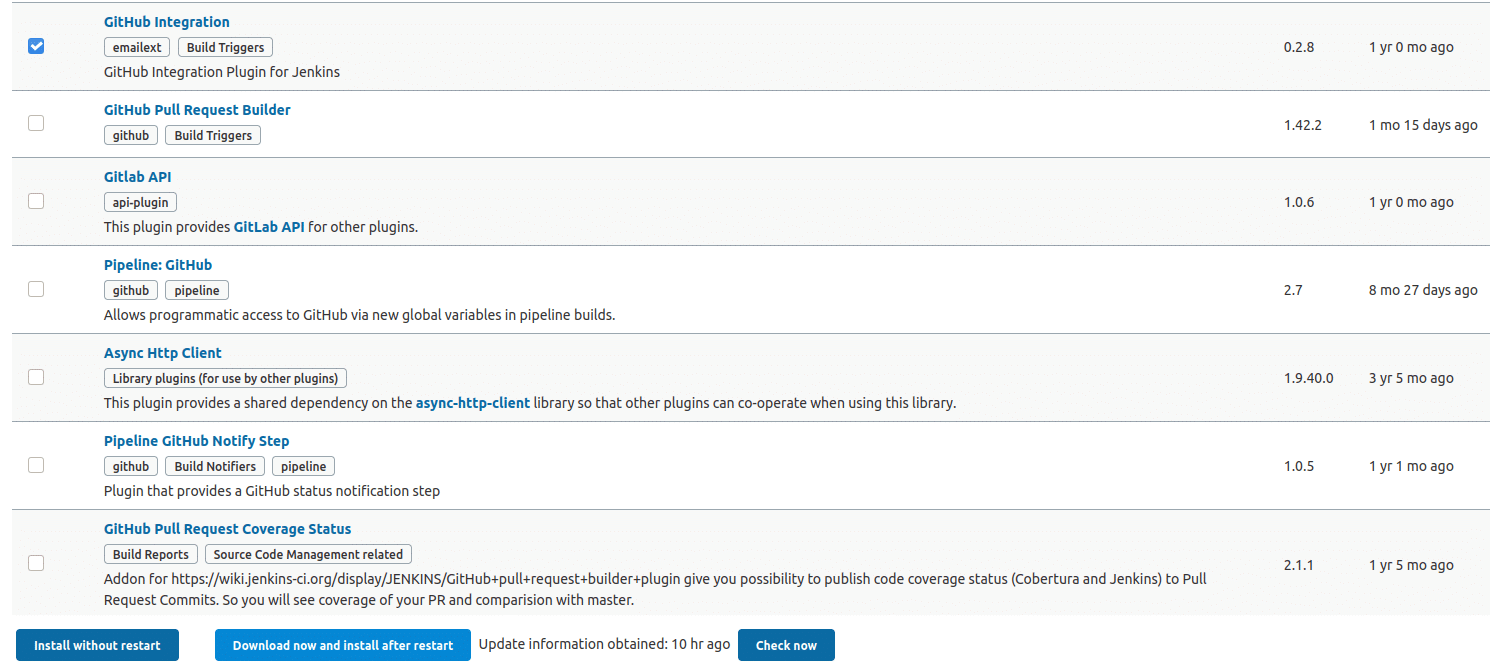
First, install the GitHub integration plugin. Go to Manage Jenkins, then Manage Plugins, then Available, and finally in the search box type GitHub.

Select the GitHub Integration plugin and click Download now and install after restart. This will trigger the download of the plugin and all its dependencies. Wait for all plugins to be installed and Jenkins to be restarted.
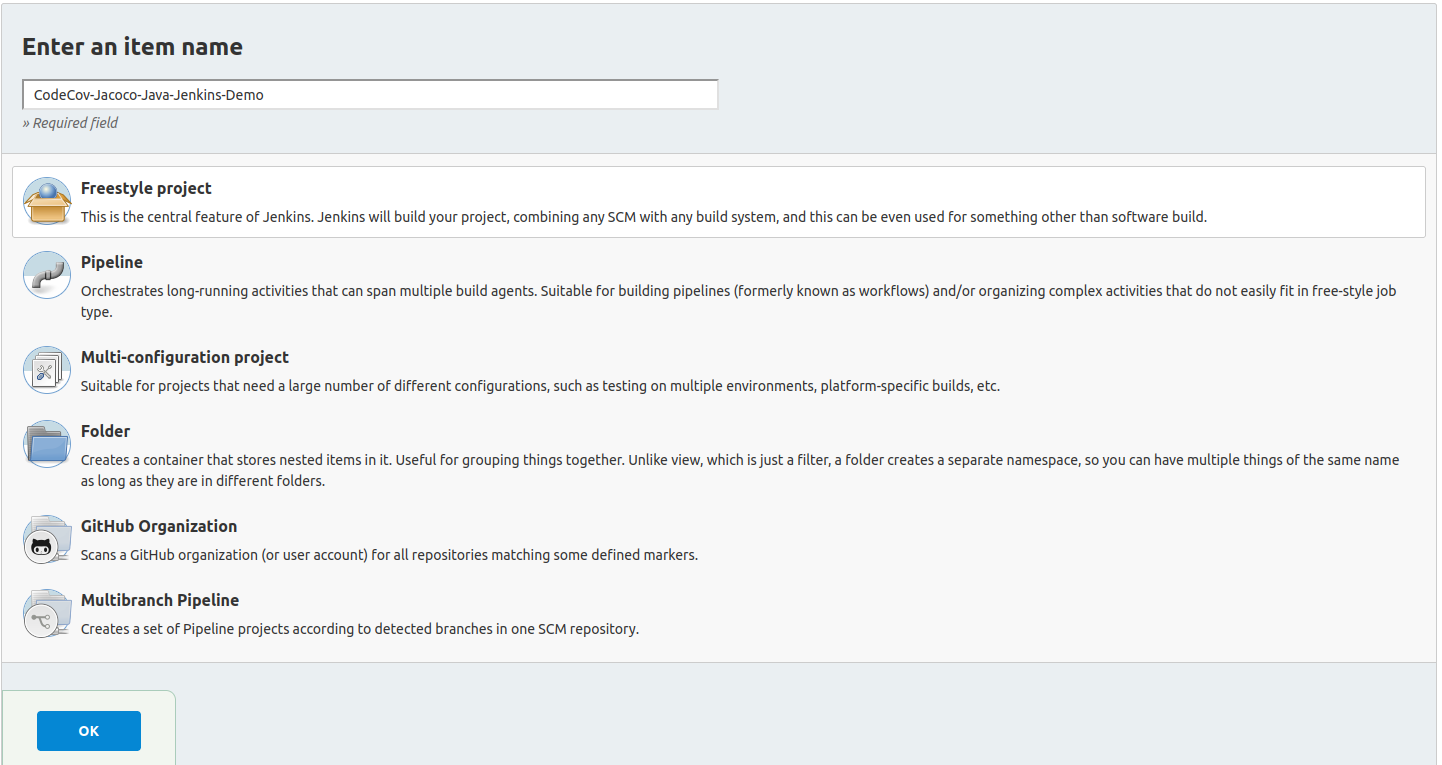
To create a job, navigate to your Jenkins dashboard and click the *New Item tab at the top left. Give your job a suitable name or maintain the repository name.

Select Freestyle project and click OK to continue.
Next, you’ll tell Jenkins that your project is hosted in GitHub by adding the URL of your GitHub project. Scroll down and select the Git radio button under the Source Code Management section.
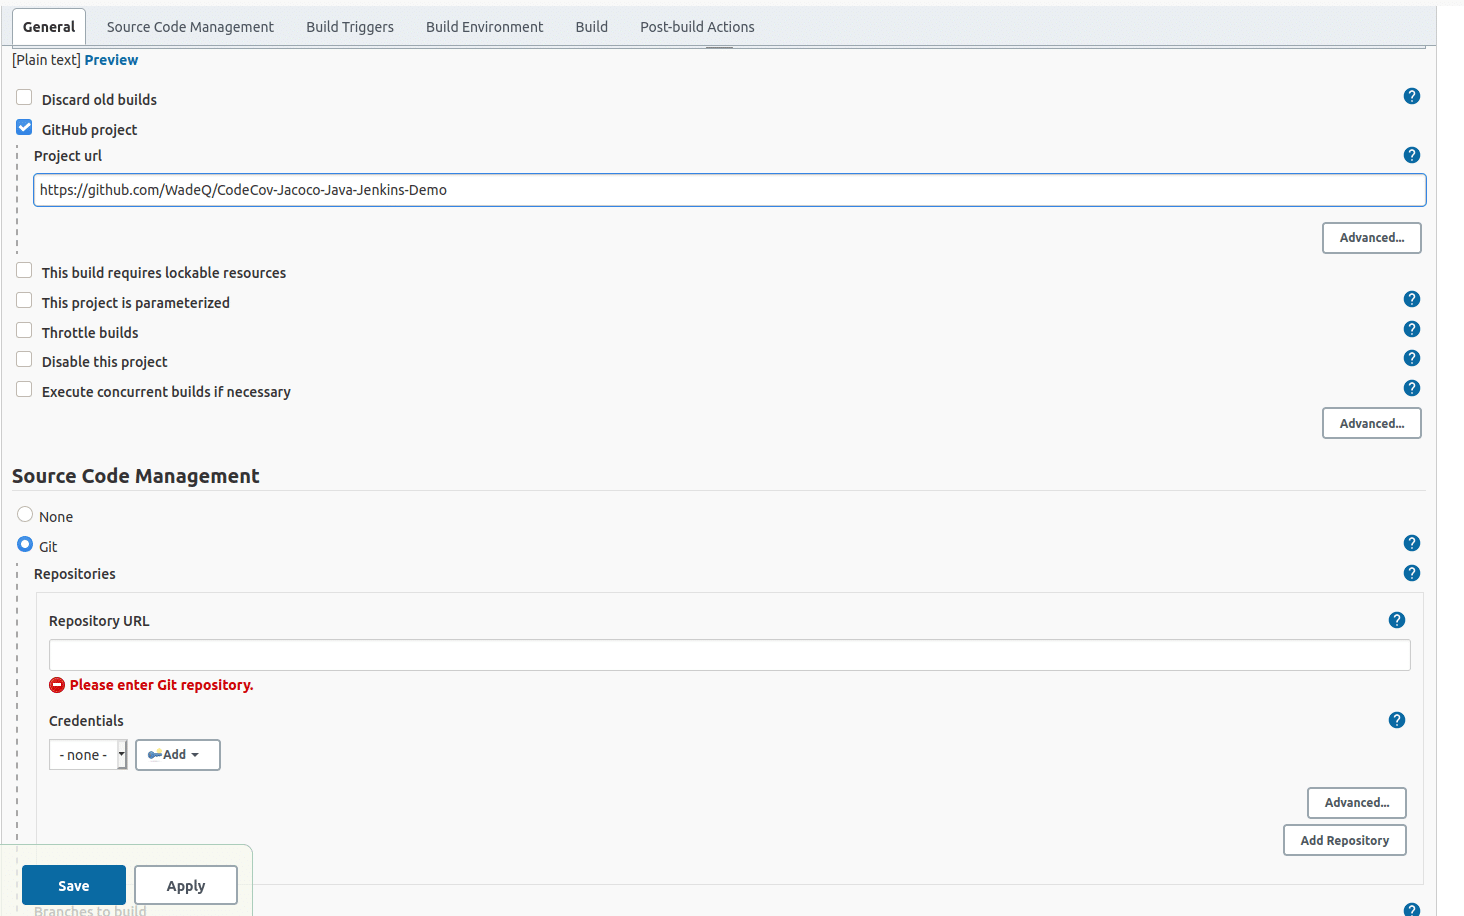
Paste in your GitHub repository URL, or the URL that will be used to clone the project.
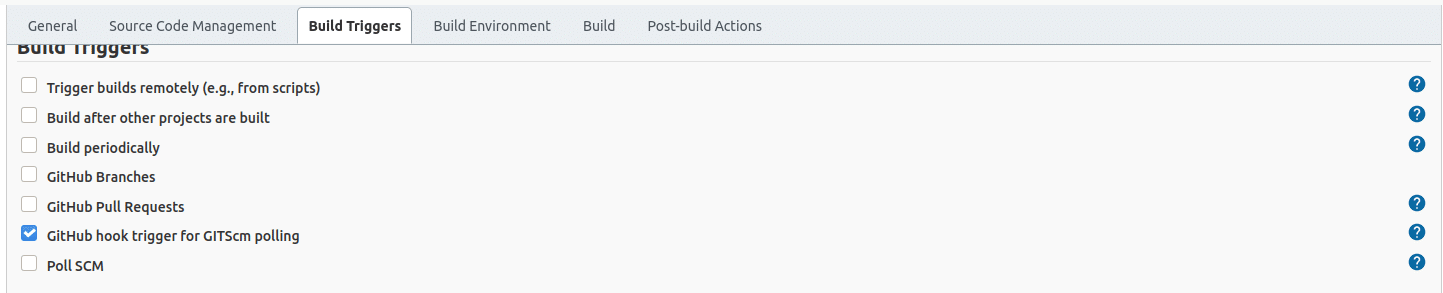
Scroll down to Build Triggers. This section lets you tell Jenkins when it should start building your job. Since you want it to trigger a build any time something changes in GitHub, check the box next to GitHub hook trigger for GITscm polling. This instructs Jenkins to listen for incoming requests from GitHub and trigger builds.
Click Save.
One final thing: you need to ask GitHub to notify your Jenkins installation after every commit. Go to your GitHub repository, click Settings, then Webhook. This allows external services to be notified when certain events occur. Click Add Webhook.
Notice that a payload URL is required; this URL is the address of your Jenkins installation. Append /github-webhook/ to it. For content type, choose application/json.
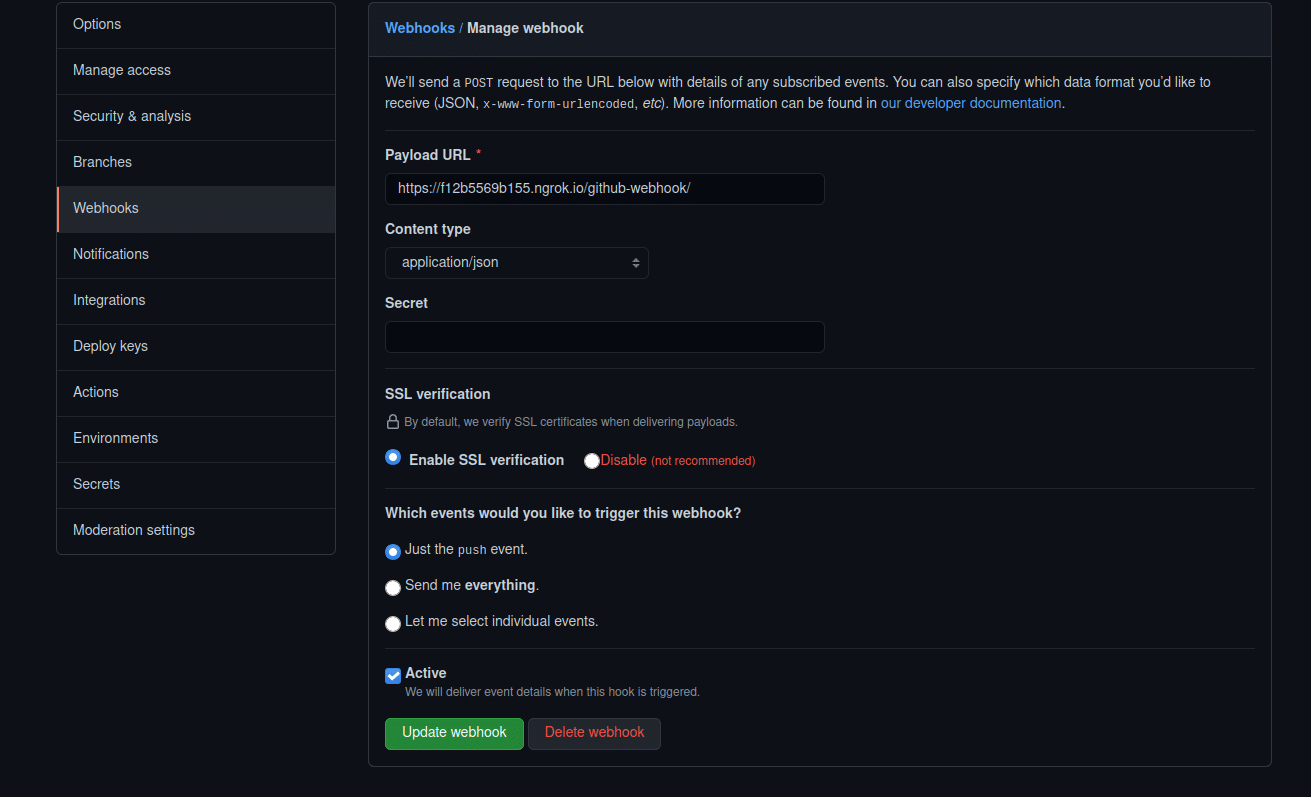
If you use localhost:8080 as your URL address for your Jenkins installation, you’ll notice that you bumped into some errors when setting up the hook. Localhost is a local IP address, but what GitHub needs is a public address. If you’re not using a public IP, ngrok is an ingenious way to achieve the same results with minimal effort.
If you used a secret for Jenkins installation, you’ll have to use the same secret in the Secret field as shown in the previous image. If not, ignore it.
Specify that you want this webhook to be triggered when push events occur. To make your webhook active, check the Active checkbox. Click Add webhook to finish up.
Test your whole workflow by making a commit.

A commit to your repository successfully triggers a build in Jenkins.
Setting Up Codecov for Code Coverage Reporting
Before you add Codecov for your code coverage needs, you need JaCoCo. To add JaCoCo plugins to your root build.gradle, add its dependencies.
allprojects {
    apply plugin: 'java'
    apply plugin: 'maven'
    apply plugin: 'jacoco'

    sourceCompatibility = 1.8
    targetCompatibility = 1.8

    repositories {
        mavenLocal()
        mavenCentral()
        jcenter()

        maven { url "https://repo1.maven.org/maven2/" }
    }
}

subprojects {
    dependencies {

    }

    test.useTestNG()
}

test {
    useJUnitPlatform()
    finalizedBy jacocoTestReport
}

jacocoTestReport {
    dependsOn test
    reports {
        xml.enabled true
        xml.destination file("${buildDir}/reports/jacoco/report.xml")
        html.enabled true
        csv.enabled true
    }
    subprojects.each {
        sourceSets it.sourceSets.main
    }
    executionData fileTree(project.rootDir.absolutePath).include("**/build/jacoco/*.exec")
}

dependencies {
    implementation 'junit:junit:4.12'
    implementation 'org.junit.jupiter:junit-jupiter:5.4.2'
}

jacocoTestReport.dependsOn {
    subprojects*.test
}
Run your tests by selecting coverage to test your JaCoCo workflow.
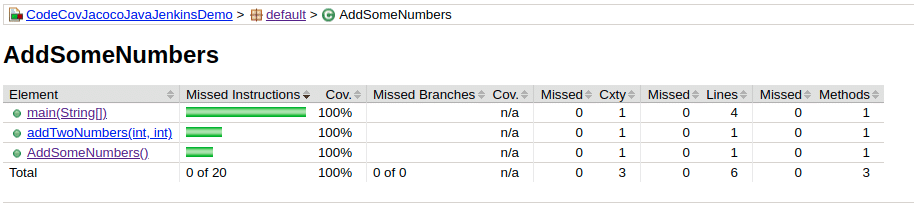
You should see test coverage results on your Class, Method, and Lines of code. To view your test results as HTML, navigate to Build -> Reports -> JaCoCo -> Test -> HTML, right click on the index.html file, and select Open with browser. Select any browser to view your coverage report in HTML.
To view your coverage reports in Jenkins, begin by configuring Gradle for Jenkins. Head over to your Jenkins dashboard, select Manage Jenkins, navigate to Global Tool Configuration, and select Gradle installation. Add the path to your Gradle and give it a name. While it could be anything memorable to you, GRADLE_HOME sounds decent enough. Uncheck Install automatically and save your changes.
!Gradle installations options](https://i.imgur.com/0IDqL3Q.png)
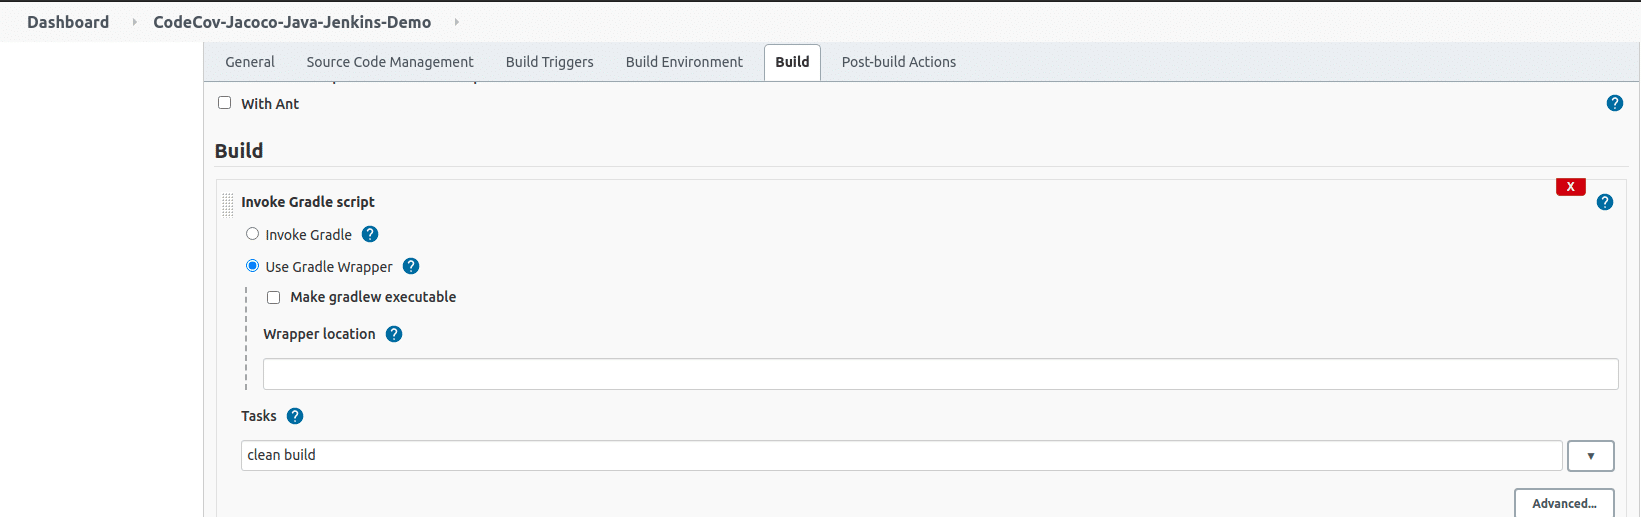
To include your build steps as part of your Jenkins build setup, navigate to your Jenkins Dashboard and select your project. On the far left of the dashboard, choose Configure.

Scroll down to the Build section of the page and select the radio button for Use Gradle Wrapper. Under Tasks, write your Gradle build script. clean build should trigger builds to compile the source code, run the tests, and assemble the JAR artifact.
Build your project to test the whole workflow.
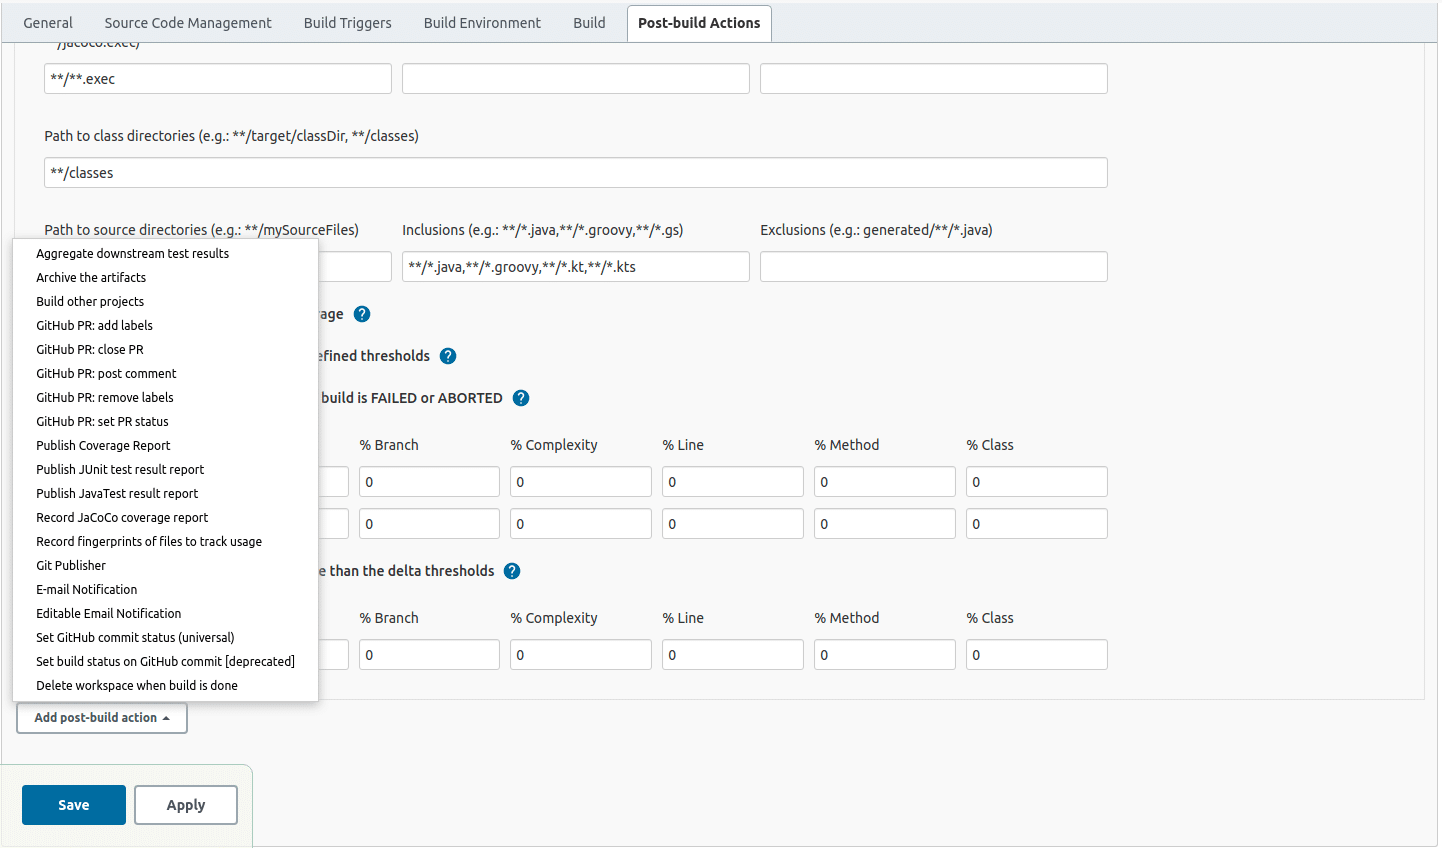
To view your post-build actions including coverage reports, navigate to Post-build Actions, click Add post-build action and select a Jacoco coverage report as shown in the following image. Jenkins should do the rest of the setup for you by default.
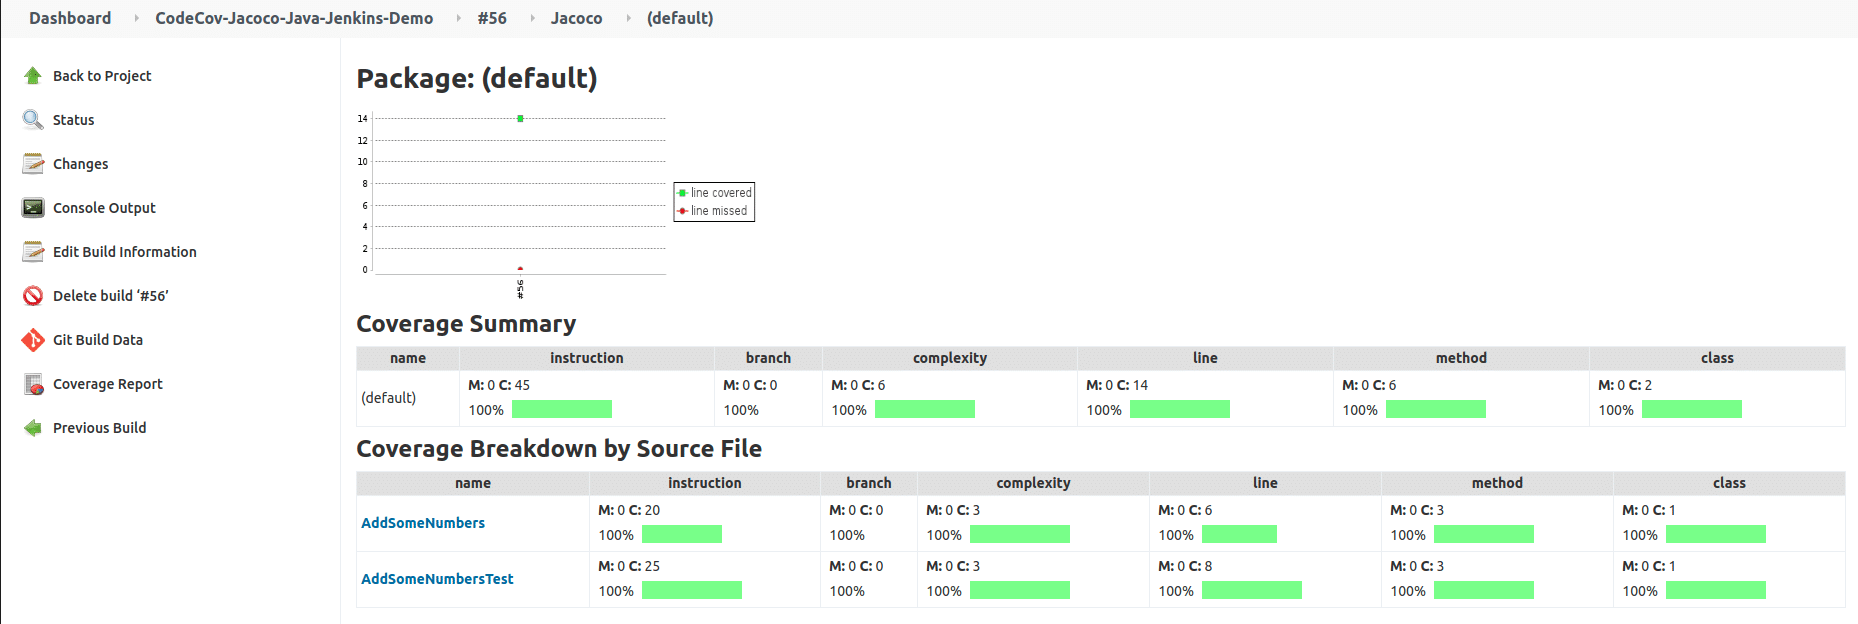
Run your build again. You should see your JaCoCo coverage report summary published on Jenkins.
Viewing Code Coverage in Codecov
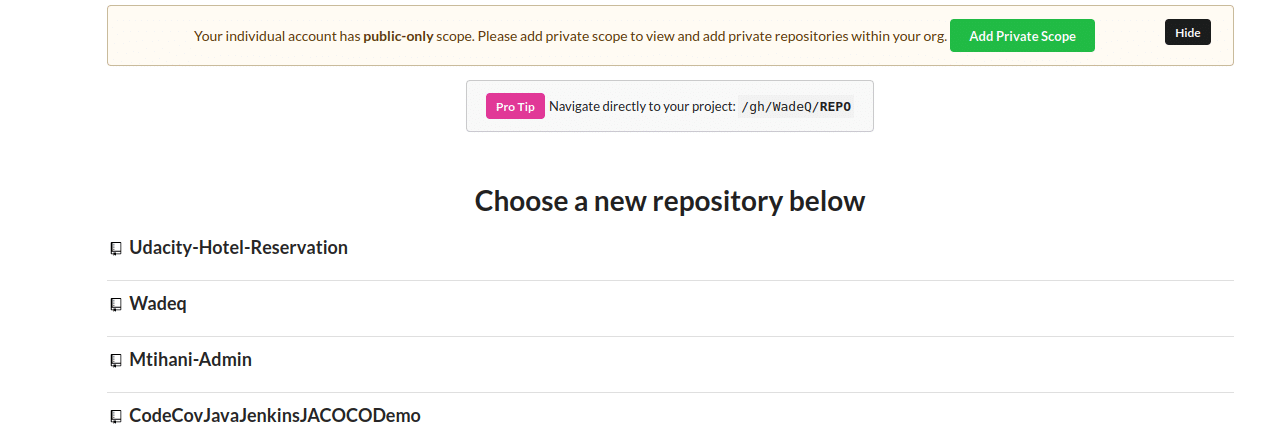
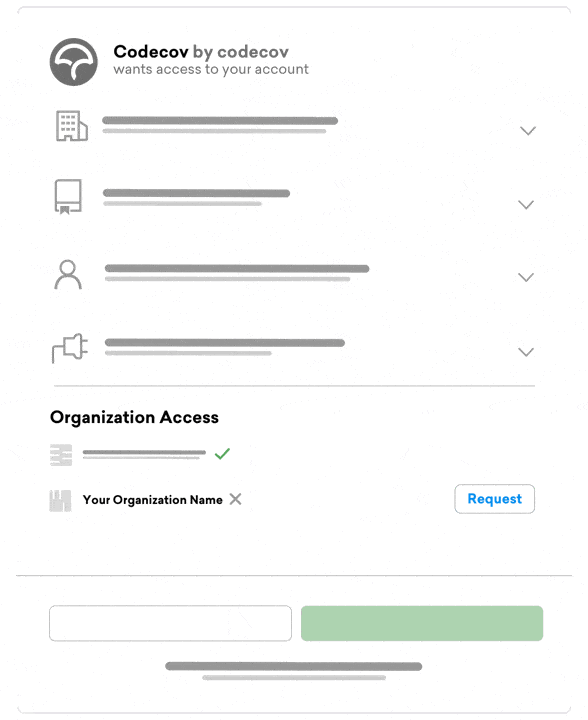
In order to use Codecov, you’ll need to sign up at the official site, or you can opt for the GitHub sign-up option. Once you’ve signed in, select your repository.
After selecting your desired repository, you should see your Codecov dashboard. Note that when using GitHub Actions with Codecov, you’ll need a unique upload token as shown in the following image. This token is useful only if your repository is private. The token is required to identify which project the coverage belongs to.
 Great! Now head over to your IDE and create a
 jenkins.yml file in your root project directory under .github -> workflows, and add the following script:
name: Jenkins CI

on:
  push:
    branches: [ main ]
  pull_request:
    branches: [ main ]

jobs:
  build:

    runs-on: ubuntu-latest

    steps:
    - uses: actions/checkout@v2
    - name: Set up JDK 11
      uses: actions/setup-java@v2
      with:
        java-version: '11'
        distribution: 'adopt'
    - name: Grant execute permission for gradlew
      run: chmod +x gradlew
    - name: Build with Gradle
      run: ./gradlew clean build

  test:
    runs-on: ubuntu-latest
    steps:
      - uses: actions/checkout@v2
      - name: Run tests
        run:  ./gradlew clean build
      - name: Coverage Report
        run:  ./gradlew jacocoTestReport
      - name: Upload coverage to Codecov
        uses: codecov/codecov-action@v2
        with:
          fail_ci_if_error: false
Here, you’re defining a job called build that’s going to compile the source code and run your tests.
In the test job, you’ve defined three steps:
- one to run the test with coverage
- one to generate the coverage report
- one to upload the coverage to Codecov
To test the whole workflow, push a new commit, and your workflow will start. A successful build on Jenkins should upload your Jacoco coverage report to Codecov as shown in the following image.
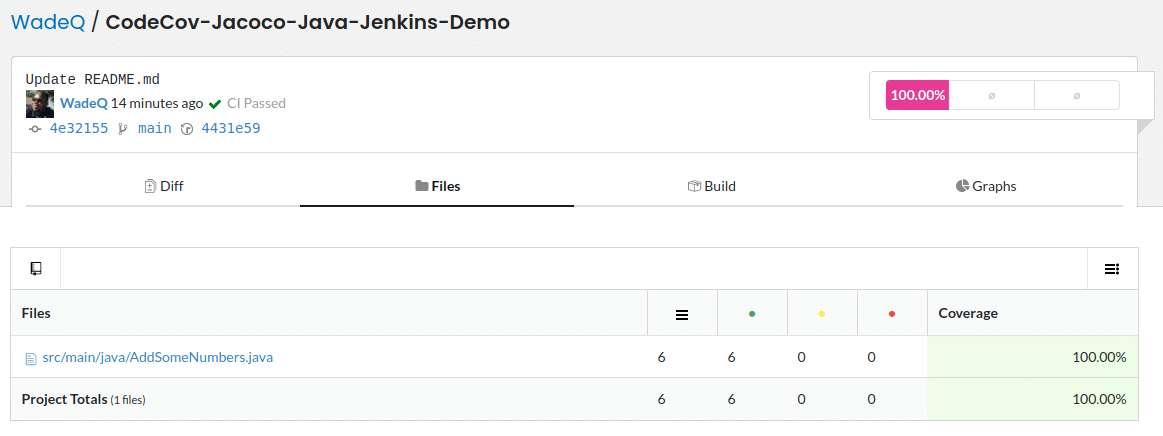
Satisfying, right?
Now you’ve successfully written tests and used Codecov to give you a comprehensive coverage report with actionable insights to ensure you are shipping quality code.
Conclusion
The importance of testing and code coverage cannot be overemphasized. Code coverage allows you to see what you tested, what you missed, and why or how, as well as give you confidence in the quality of your code.
By now, you should be equipped to run local tests and use code coverage tools like Jenkins and JaCoCo. You can configure Jenkins and integrate it with a GitHub repository using webhooks. And you know how to set up Codecov as a code coverage reporting tool, making the process more visual and simple to activate on.