If you’re familiar with traditional testing concepts like unit tests and code coverage, you are likely aware that it is too easy to write high-coverage tests that don’t deliver value. It is unfortunate that in some cases, a number of software developers write worthless tests to boost coverage. This typically happens when code coverage thresholds are set as a requirement, as explained by Goodhart’s law:
When a measure becomes a target, it ceases to be a good measure.
Mutation testing is one option to avoid this trend of misleading tests. Mutation testing is the practice of “testing your tests” by deliberately introducing faults (called “mutants”) into your source code and then running the test suite against the mutated code to see if the faults are caught. This approach can help you gain confidence in your test suite. It demonstrates that the tests work as intended to catch defects in the code rather than simply existing to boost coverage without making any useful assertions—or worse still, failing to properly test the given unit of code and it passing nevertheless. Because the inner workings are exposed to the tester for viewing and modification, mutation testing is considered to be a type of white-box testing, as opposed to black-box testing, where only the outer shell or user experience is tested.
In this article, you will learn about the core concepts behind mutation testing and how they come together to give you the tools you need to test your tests and have confidence in your code coverage.
Understanding Mutation Testing
The idea of mutation testing involves introducing small changes or “mutations” into your codebase and then running your existing test suite against this “mutant” codebase to determine if the tests can detect the changes. There are a few terms that you should familiarize yourself with to help you understand mutation testing:
- Mutants: Here, the term mutant refers to one of the altered instances of the codebase. Typically, these mutations will be small, atomic changes, affecting only one aspect of the codebase for each mutation. Depending on the outcome of the mutation testing, mutants will be classified as either killed or survived.
- Killed mutants: These are mutant codebases that were successfully detected and “killed” by the test suite. This means that the output of the test suite differed between the original code and the mutant code, indicating that the test suite was able to detect the change in the code.
- Survived mutants: If the test suite does not catch a mutation, the mutant is considered as “surviving” or “alive.” This is not desirable, as the goal of mutation testing should be to detect and kill as many mutants as possible.
- Equivalent mutants: These mutants occur when the mutation causes the code to have the same meaning or interpretation, albeit with different syntax. In such cases, you might expect the test suite to give the same output for the equivalent mutant as it would give for the unmutated codebase. Equivalent mutants are not considered when calculating the mutation score.
- Mutation score: This is the quantifiable metric that you can use to measure the effectiveness of your mutation testing efforts. The score is calculated as follows:
score = (mutants killed / (mutants killed + mutants survived)) * 100
The fewer mutants that survive, the closer your score will be to 100. A higher score is better.
- Mutation operators: These operators are used to define the types of mutations that the code can be subjected to. They allow for controlled and repeatable mutations.
Different Types of Mutations
There are three main types of mutations that you can use to alter your source code. Let’s take a closer look at each one.
Value Mutations
A value mutation is where you modify a hard-coded value or parameter, usually to a small degree. Consider the following JavaScript function:
// Check if the user is 18 or older
const isOldEnough = (age) => {
   return age >= 18;
}
This function relies on a static value, the number 18. A value mutation for this code could be to change the number 18 to 19 or 17 to see if the function returns a different output after the mutation.
Statement Mutations
A statement mutation is when you modify or remove an entire statement, such as a block of code. Consider the following JavaScript example:
// echo output depending on whether the user is over 18 or not
if (isOldEnough(user.age)) {
    console.log('User is old enough);
} else {
    console.log('User is not old enough’);
}
In this case, a statement mutation might involve removing the else block. To catch this mutant, a test would need to have expectations about the output on this particular code path.
Decision Mutations
Decision mutations typically occur when changing the logic behind a comparison. This could be swapping < and >, or === and !==, or any other similar mutation that changes the sentiment behind a comparison. Consider the first example with the isOldEnough function again. Here, you could replace the >= operator with <=, which changes the meaning of the function and should thus be detected by the function’s unit tests.
Mutation Testing in Practice
Although you can perform mutation testing manually by mutating your source code and then running tests, this approach can be resource-intensive and difficult to maintain. Instead, you should consider using a mutation testing tool like Stryker
or PIT. This guide will use Stryker, but the principles remain the same regardless of your tools.
To understand how mutation testing works in practice, it’s best to see how Stryker interacts with an actual codebase. If you want to see the repository for this code in its finished state, you can find it here.
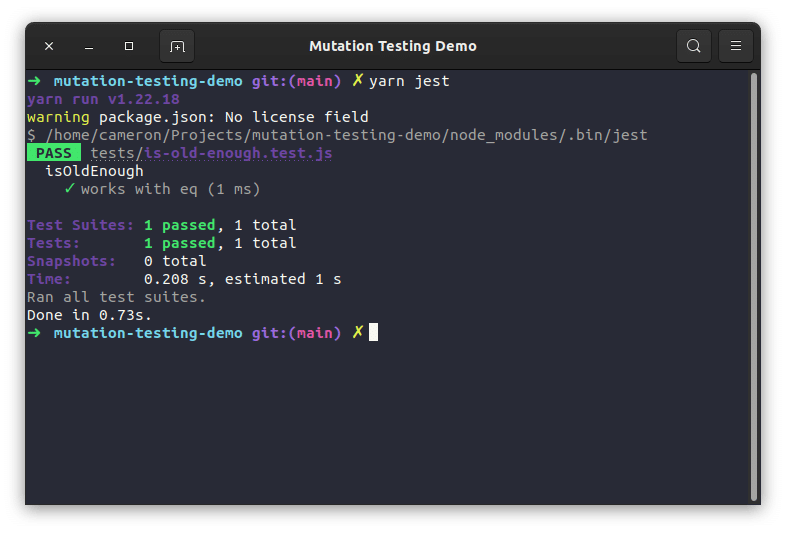
This sample codebase contains one function, the aforementioned isOldEnough function from the earlier examples, and some corresponding unit tests. You can run the Jest unit tests in the terminal like so to see that the current test passes:
yarn jest
After following the Stryker documentation to get it set up and working, you can run mutation tests against this small codebase with the following command:
npx stryker run
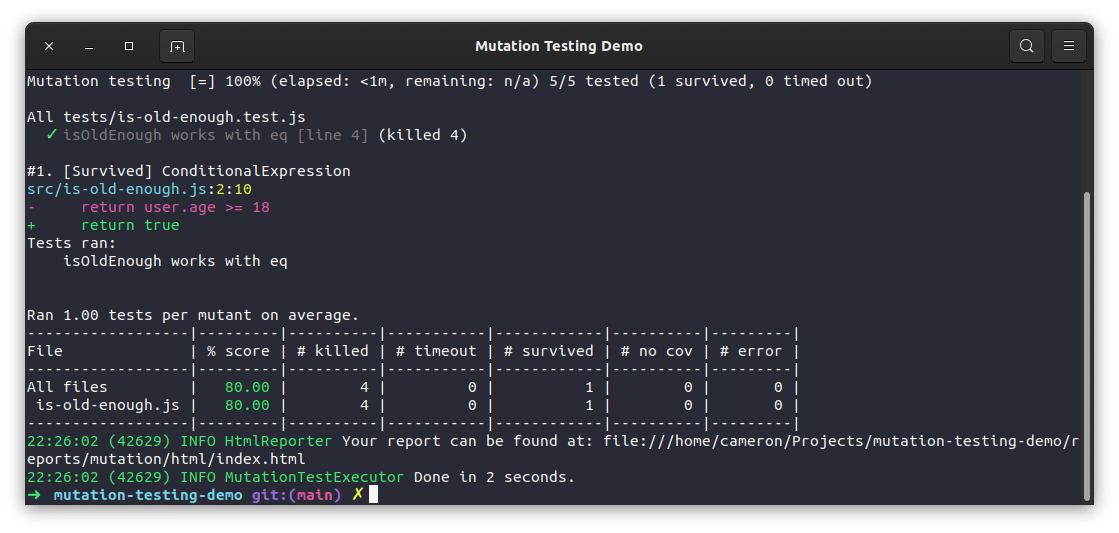
Here, you can see that Stryker automatically generated five mutants for this function. The simple test that covered this function was able to identify and kill four mutants with one survivor. You can see in the output what this survived mutant was. The test case did not detect when the function was mutated to always return true. If you were to add another test to check that the function returns false in the expected scenarios, this mutant should be eliminated:
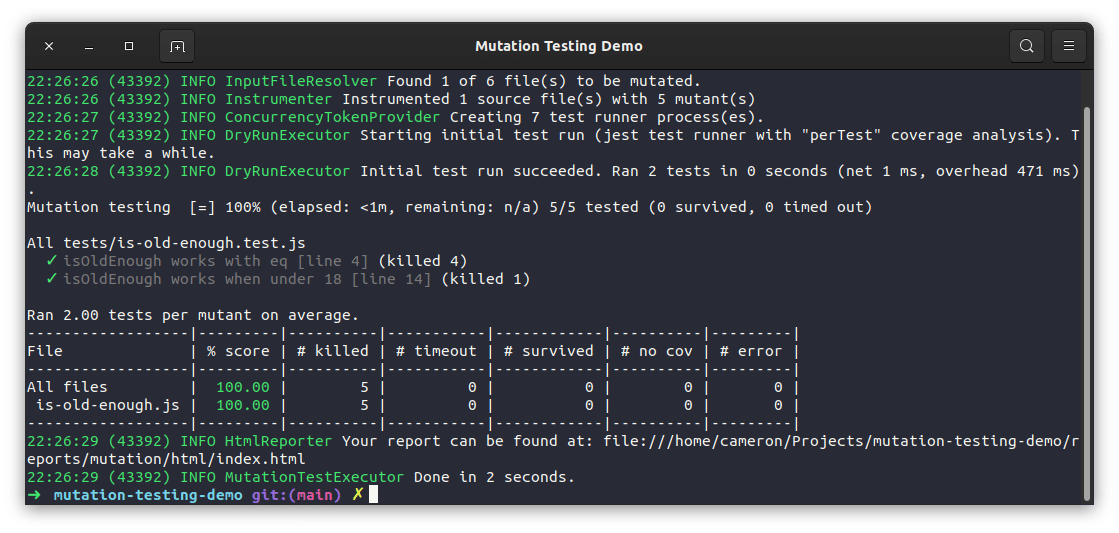
With the addition of this extra test, all mutants for this function are eliminated, and the score is 100 percent as desired. To see how this score is calculated, you can refer back to the formula shown above.
For just this one tiny function, Stryker generated five mutants. It’s easy to see how doing this manually and at scale can become laborious. Real codebases tend to comprise many more—and much larger—functions. The more complex the functions are, the more opportunities for mutation there are and thus more things that you can test. For this reason, it is highly recommended that you consider using a mutation testing tool.
Mutation Testing Tools
Depending on the tools and languages that you use, there is a good chance that you will be able to find some libraries to help you with your mutation testing efforts. The following is a list of a few tools and the languages that they work with:
- Stryker: JavaScript, C#, Scala
- Infection: PHP
- go-mutestring: Golang
- PIT: Java
- Jumble: Java
This list is not exhaustive, so it is worth searching around online if you need a tool for a different language. However, note that mutation testing is not as mainstream as other testing methodologies such as unit, integration, or end-to-end testing, so naturally, tooling and support is not quite at the same level. Despite this, mutation testing offers some benefits when it comes to ensuring the quality of your tests.
Wrapping Up
In this article, you’ve learned what mutation testing is and the various concepts it is built upon, such as mutants and mutation operators. You’ve also seen some examples of how you can use mutation testing to identify gaps in test suites and highlight areas that need better coverage, leading to higher-quality tests and, by extension, a higher-quality codebase.
If you are interested in keeping your codebase’s quality at a high level, consider using Codecov, a dedicated tool for monitoring code coverage. With source code monitoring, a huge variety of languages and CI/CD integrations, and static checks for ensuring the quality of merged code, Codecov helps any organization deploy with confidence by shipping healthier code faster.