Typescript, released in 2012, is one of the most popular languages in the world. This article will walk you through an example Typescript project to get up and running with testing and code coverage. You can view the entire source code of this post at our example repository.
You will need to create a new public repository in GitHub. You should also go ahead and create a Codecov account.
Getting started with Typescript
We will start with a simple calculator app that exposes two functions: add and subtract. Both functions accept two arguments and return a number. We can paste the code below into the file app/calculator.ts
export function add(x: number, y: number): number {
  return x + y
}

export function subtract(x: number, y: number): number {
  return x - y
}
Now, let’s add a test for our add function.
app/calculator.spec.js
import {  add } from './calculator'

test('add function', () => {
  expect(add(1, 2)).toBe(3);
});
To run our tests, we will be taking advantage of the jest package. We will need to create a package.json file.
package.json
{
  "name": "@codecov/example-typescript",
  "version": "0.0.1",
  "description": "Codecov Example Typescript",
  "main": "index.js",
  "devDependencies": {
    "@babel/preset-env": "^7.18.2",
    "@babel/preset-typescript": "^7.17.12",
    "jest": "^28.1.1",
    "typescript": "^4.7.4"
  },
  "scripts": {
    "test": "jest"
  },
  "license": "MIT",
  "module": "commonjs"
}
We will also need to add some compilation configuration. Create a file tsconfig.js with the following
tsconfig.json
{
  "compilerOptions": {
    "module": "commonjs",
    "sourceMap": true
  }
}
We are also using babel to convert our typescript. Create a babel.config.js file
babel.config.js
module.exports = {
  presets: [
    ['@babel/preset-env', {targets: {node: 'current'}}],
    '@babel/preset-typescript',
  ],
};
Run your tests and get coverage
To run our tests, run npm install && npm run test in a terminal window
--> npm install && npm run test
…
> @codecov/example-typescript@0.0.1 test
> jest

 PASS  app/calculator.spec.ts
  ✓ add function (2 ms)

Test Suites: 1 passed, 1 total
Tests:       1 passed, 1 total
Snapshots:   0 total
Time:        0.608 s
Ran all test suites.
To get coverage results, we will need to update our jest settings. Update the package.json file with the following inside the first bracket.
package.json
…
  "jest": {
    "collectCoverage": true,
    "coverageReporters": [
      "text",
      "cobertura"
    ]
  }
Install the dependencies and run the tests to view coverage
--> npm run test

> @codecov/example-typescript@0.0.1 test
> jest

 PASS  app/calculator.spec.ts
  ✓ add function (2 ms)

---------------|---------|----------|---------|---------|-------------------
File           | % Stmts | % Branch | % Funcs | % Lines | Uncovered Line #s
---------------|---------|----------|---------|---------|-------------------
All files      |      50 |      100 |      50 |      50 |
 calculator.ts |      50 |      100 |      50 |      50 | 6
---------------|---------|----------|---------|---------|-------------------
Test Suites: 1 passed, 1 total
Tests:       1 passed, 1 total
Snapshots:   0 total
Time:        0.836 s, estimated 1 s
Ran all test suites.
Note that we are showing 50% code coverage.
How to upload to Codecov
Now that we are able to collect coverage locally, let’s learn how to upload these reports to Codecov. Codecov is a code coverage tool that provides reports on how much of a project’s codebase is tested. It is often used in conjunction with continuous integration (CI) systems to ensure that new code changes are adequately covered by tests.
We will be using GitHub Actions as the Ci and the Codecov Action to upload coverage reports.
Create a file called .github/workflows/ci.yml.
name: Workflow for Codecov example-javascript
on: [push, pull_request]
jobs:
  run:
    runs-on: ubuntu-latest
    steps:
      - name: Checkout
        uses: actions/checkout@v2
      - name: Set up Node 18
        uses: actions/setup-node@v3
        with:
          node-version: 18
      - name: Install dependencies
        run: npm install
      - name: Run tests and collect coverage
        run: npm run test
      - name: Upload coverage to Codecov
        uses: codecov/codecov-action@v3
It is recommended that you install the Codecov app for this repository to prevent rate-limiting issues. Save your code and push up to GitHub.
git checkout -b 'initial-commit'
git add .
git commit -m 'Initial commit and upload coverage to Codecov'
git push origin initial-commit
In GitHub, open the pull request and wait for CI and Codecov to finish running and analyzing. You should see the following pull request commit.

You should also see four status checks, two of which come from Codecov.

Our documentation contains more information on the meaning of each status check. When you are ready, merge the pull request.
Covering uncovered code
Now that we can get coverage data in our pull request. Let’s take a look at how to increase coverage.
Let’s take a look at the coverage report from Codecov. Navigate to your repository from the Codecov UI. You should see a dashboard like this.

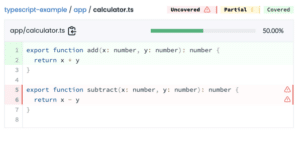
Notice that there are only 2 covered lines in the Code tree. If we click on app, and calculator.ts, we’ll come to the file view.

From this view, we can tell that we haven’t written a test for our subtract function!
Create a new branch in your terminal
git checkout main
git pull
git checkout -b 'subtract-test'
and replace the test file app/calculator.spec.js with the following code.
import { add, subtract } from './calculator'

test('add function', () => {
  expect(add(1, 2)).toBe(3);
});

test('subtract function', () => {
  expect(subtract(1, 2)).toBe(-1);
});
Save the code and open a new pull request.
git add .
git commit -m 'fix: add tests for subtract fn'
git push origin subtract-test

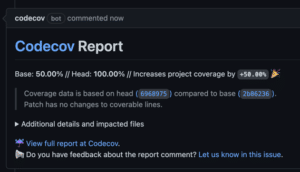
Notice the Codecov comment shows the coverage increasing from 50.00% to 100.00%.
Advanced Codecov configurations
Now that you have uploaded your first Javascript coverage reports successfully to Codecov, you can check out some of our other features including
- configuring Codecov settings
- adding Flags to isolate coverage reports
- labelling critical files
